Saturday, November 8, 2008

Tally Data Migration

The Tally Data Migration Tool helps you upgrade from Tally 7.2 to Tally 9, by migrating Data and TCP (Tally Compliant Product) files. It also restores 7.2 backup files.
Using the Tally Data migration Tool, you can migrate Payroll data also
Tally 7.2 Data and TCP files cannot be used on Tally 9 unless you migrate them, for which you need to be a licensed user of Tally 9.
Tally 6.3 users can also use the migration tool, which will rewrite the version to Tally 7.2 and then migrate the data to Tally

Tally Data Migration ടൂള്‍

The Tally Data Migration Tool works with the tally 9. exe and helps you migrate Tally 7.2 company data. It also helps you migrate Tally 7.2 TCP files.
A brief explanation on Tally Data Migration and Tally 9 screen follows, as both screens open simultaneously during migration.

Migrate Company Menu
The Migrate Company menu displays the following:
· Migrate Data
· Migrate TCP
· Restore 7.2 Backup
Migration Messages Pane
The migration status displays in the Migration Messages Pane when the migration is in progress.
Calculator PaneIf errors occur during migration, then an error message displays in the Calculator പാനല്‍

Migrating Data

If you have enabled and used Payroll in Tally 7.2, before migrating data, ensure that the Payroll process for the previous month is complete and processed because Payroll in Tally 9 will be effective from the date of migration.
· Migrating Data from Tally 7.2 to Tally 9
· Migrating Group company data from Tally 7.2 to Tally 9
· Post Migration Steps for Payroll data in Tally 9
Advantages of Migrating Payroll data from Tally 7.2 to 9
1. Processing Payroll in Tally 9 has now become so easy that you can generate a Pay slip in four steps.
2. Pay Head and Salary details creation has become user-friendly and can be defined at the master level.
3. Though there is a hierarchy change in Pay Heads, after migration to Tally 9 the migration tool allows you migrate the calculation type specified in Tally 7.2, thus allowing you to continue generating Payroll reports.
4. A simple re-configuration of the Pay Heads after migration allows you to continue with the Payroll processing in Tally 9.

Migrating Data from Tally 7.2 to Tally 9

For an existing 7.2 customer, the migration process takes place as explained below.
1. Click the tallymigration icon to start the migration.

2. Tally Data Migration and Tally 9 start simultaneously, in separate screens.As soon as Tally 9 is loaded, the message ‘Ready for Migration’ displays in the Migration Messages Pane.

Wednesday, October 8, 2008

Tally Licensing

Tally Licensing is one of the best thing for Tally and the most unique licensing system for stopping software piracy. In fact Tally is one of those software companies who had succeeded in stopping the piracy of software by implementing innovative licensing system.
Although it has proved a boon to company but is has been a bane for the users. This licensing system has raised difficulties for its users. According to Mr Bharat Goenka , Managing Director Tally India, life of pirated user is more easier the original user. All the hardship of licensing are faced by original user.
Many of Tally users have asked me about licensing related problem from time to time.These are related to activation of license, surrender of license and the updation of license. Lets understand the licensing process to solve the problems faced.

The Process of Licensing
After Installing Tally, you have to activate the license. Activation of license actually puts the signature of your computer into Tally's server. The signature, which contains information related to version of operating system, the hardware installed, the machine name etc is stored in Tally's server against your serial no. That serial no. is blocked against any other installation preventing duplication of your license. Internet is needed to send the signature file to Tally's server. In response to the entry a file is sent to the computer which is stored in the same folder where Tally is installed. This file is stored as tally9.lic in same folder where tally is installed.
There are two ways to activate the license. Online and Offline. Computer with direct internet connection can activate the license by online process. Those computers which has no direct internet have to follow offline process.


Activation of License

The License is to be activated to avail full features of Tally. If the license is not activated Educational would be shown on the top right corner. And Multi Account printing menu would be disabled.
Just after starting the tally the activation form is displayed. After connecting the internet this form has to be filled and submitted. The serial no. and the key is printed on every box which comes with Tally. You have to fill the email address which you often use because tally sends latest updates regarding product on this email address.

The offline Process.
If you don't have the direct access to internet then you have to follow the offline process of license activation. The concept is same, a file has to be generated and sent to the tally server and another file from server has to be installed in Tally machine. If the computer has no internet connection then we have to find a pc where the internet connection is available. So the file from our computer has to be generated and then copied to another system and from there it has to be uploaded and the resultant file has to be again copied in tally folder.
For this out have to escape the activation form in the starting and perform following steps.
Go to F12 -> Licensing -> Offline -> Activation.
Again the same form will be displayed and after pressing enter with all information filled a file called tallyreq.lic would be generated. This file has to be copied on any cd or pen drive and pasted in the computer where internet connection is available. (if Tally is not installed on that computer then it is to be installed there also.)
Here when you follow these steps:-
Go to F12 -> Licensing -> Offline ->SEnd External Request.
You would get tallyresp.lic file in response to file you have uploaded. Now the last and final step of offline activation is to copy the file from Tally folder and paste in the folder where Tally is to be activated. After pasting the file just run Tally and you would be greeted by a message of successful activation and a prompt for you to register your software.


Your Tally is activated.

Updation of Tally License
The Tally License has to be updated frequently. This is usually done to prevent license being expired. After 30 to 45 days you would start watching a message in your lower right corner that your license is going expire, please update/renew your license. This message is usually 5 days
prior to the expiry of license. During this period what you have to do is just connect to Internet and start Tally. The License is automatically updated. Otherwise you can choose
F12-> Licensing->Online-> Update

Surrender of License
Tally has made provisions to surrender the software license in case The machine you are currently using is going to be formatted. If the change is inevitable then one should surrender the license so that the information written in Tally server can be erased. Only after successful surrender of your license it can be installed on another machine.
F12 -> Licensing -> Online -> Surrender
Here it is noteworthy that while surrendering the license we should update the license first just to check that if internet is working properly or not. Otherwise it may happen that due to unavailability of connection or poor connectivity the license get surrendered on machine but information on internet server is not correctly updated. So only after successful message of updation you should surrender the license.

So from the above discussion it is clear that:-
1. We activate license to make it origional.
2. We update license when it is going to expire and
3. We surrender the license just to reactivate it somewhere else.

TallyAscent

Imagine an ERP system that adapts itself to your business, instead of force-fitting your business to a set system. Or an ERP solution that serves as your primary business management application, right from the day you start implementing it. With TallyAscent, these unbelievable concepts are now a reality.

Welcome to TallyAscent – the revolutionary fully integrated suite that overcomes the time and cost challenges associated with traditional ERP. TallyAscent follows ‘iterative implementation’, so it can be used from day one of implementation. It is very simple to use, requires minimal user training and demands the least utilisation of resources. This means that you are assured of high levels of efficiency and control, with low cost of ownership.

TallyAscent helps you adapt quickly to business changes and empowers your enterprise to gain the competitive edge in a global business environment. It puts you in control, by helping you visualise critical information, enhancing your productivity and seamlessly integrating all your business processes - irrespective of the magnitude of change or growth. This robust product fulfills the needs of a growing business, with amazing flexibility and incredible speed.

Innovative technology coupled with the power of simplicity, makes TallyAscent a perfect fit for a growing business that needs ‘business defined controls in system', rather than 'system defined controls in business’.

Tally 9 – The Complete Business Solution

As your business grows and transcends state and international borders, you need a business accounting software that keeps pace with your complex business demands and simplifies growth. The software you choose must offer you greater speed, power and reliability, besides having the ability to adapt quickly to your business. Tally 9 was engineered to effectively fulfill these needs and help overcome the challenges of a growing business.

Designed for unmatched speed, power, scaleability and reliability
Powered by Tally’s path-breaking proprietary technology - C:MuLate (Concurrent Multi-lingual Accelerated Technology Engine) – Tally 9 is the result of a perfect fusion between the Concurrent Multi-lingual Platform and Object Oriented Database Engine. This technology is what ensures the blazing speed, power, scaleability and world-class reliability that Tally 9 promises.

Features that will empower your business
The dynamic features and MIS capabilities in Tally 9 are designed to simplify your business operations, while giving you complete control over your accounting, inventory and statutory processes. Multi-lingual and data synchronisation capabilities, allow you to transact business without language barriers or geographical boundaries.

Tally 9 is very simple to learn and even easier to use. And the advantages of using this robust product are apparent from the start. To learn more about how Tally 9 can enhance your productivity and profitability, do look through the features and benefits

Thursday, July 31, 2008

Creating an Earning Pay Head

To create an Earning Pay Head, Basic Salary, under Indirect Expenses:

Go to Gateway of Tally> Payroll Info. > Pay Heads> Create


1)Enter the Name of the Earning Pay Head.

2)Select Earnings for Employees as the Pay Head Type from the List of Pay Head Types.

3)Select the respective Pay Head Group Earnings from the list for the field Under.

4)Select Yes from the list if you want the Pay head to affect the net salary.

5)The Pay Head name entered in the Name field will appear in this field. You can change the same, if required. The name entered in this field will appear on the payslip.

6)Select Flat Rate from the List of Calculation Types.

7)Select the Calculation Period Type from the list.

8)Based on the Calculation Period Type, you can select and enter the details for Per Day Calculation Basis.

9)Select the Rounding Method from the list if applicable.

10)Accept to save the Pay Head.

Similarly, you can create Earning Pay Heads for HRA, Conveyance and so on..

Creating a Deduction Pay Head

To create a Deduction Pay Head, Professional Tax under Employees’ Statutory Deductions:

Go to Gateway of Tally> Payroll Info.> Pay Heads> Create

1)Enter the Name of the Deduction Pay Head.

2)Select the Pay Head Type from the List of Pay Head Types.

3)Select the Group from the List of Groups.

4)Select Yes from the list if you want the Pay Head to affect the net salary.

5)The Pay Head name entered in the Name field will appear in this field. You can change the same, if required. The name entered in this field will appear on the payslip.

6)Select the Calculation Type from the List of Calculation.

7)On selecting the calculation type to 'As Computed Value, a new field Calculation Period appears which will be set to Months automatically

8)Select On Current Earnings Total from the list to be Computed On.

9)Specify the Slab Rate.

10)Select the Rounding Method from the list if applicable.

11)Accept to save the Pay Head.

Similarly, you can create a Deduction Pay Head for Provident Fund and so on.

A Salary Payable account under the group Current Liabilities is used to credit the total of Net Payable salary of all employees. When salary is disbursed, this account is debited and Cash or Bank account is credited.

To create Salary Payable Pay Head under the group Indirect Expenses:

Go to Gateway of Tally> Payroll Info.> Pay Heads> Create


Creating Salary Payable Ledger

1)Enter the Name of the Pay Head

2)Select Not Applicable from the List of Pay Head Types

3)Select Current Liabilities from the list

4)Accept to save the Pay Head

Creating Gratuity Pay Head

To create a Pay Head Gratuity under Current Liabilities:

Go to Gateway of Tally> Payroll Info.> Pay Head> Create


1)Enter the Name of the Pay Head

2)Select Gratuity from the List of Pay Head Types

3)Enter the Slab Rate Details for Gratuity Calculation in the sub-screen


4)Select Current Liabilities from the list

5)Accept to save the Pay Head

Note: To use the Earning Pay Head for Gratuity calculation, set Use for Gratuity? field to Yes in the ledger creation screen (for Pay Heads such as Basic Salary, HRA, and so on, created under Indirect Expenses).

Enabling Payroll in Tally

To enable Payroll in Tally

Go to Gateway of Tally > F11: Features> Accounting Features

Set Maintain Payroll to Yes

You can set More than ONE Payroll / Cost Category to Yes if you wish to process payroll for multi group of Employees
Set Maintain Payroll to Yes
The new enhanced Payroll in Tally requires minimal effort for accurate processing. Setting up Pay Heads, Employee Group, Employees, Salary Details and Attendance/Production Type is now a simple process with Tally’s Four easy steps to generate a payslip.

Step 1
Create Pay Heads
The components of structured salary are created under Pay Head

Create the salary structure components in pay head. The Pay head creation in tally is very user friendly. Tally allows creating any complex type of pay head.

Step 2
Create Employee Masters
Create an Employee master. Enter the requisite Employee Details & Employee group by grouping employees under the function they perform; their department or designation.

Step 3
Create Salary Details
Create the applicable Salary Details for both Employee Groups as well as Individual Employees with earnings, deductions and basis of computation.

Step 4
Process Payroll and Generate the Payslip
Pass a Payroll voucher to enter all Earnings and Deductions in payroll transactions that are paid along with the Salary Payslip for all employees

Generate the Payslip that provides employee as well as attendance details, itemises each component of the employee’s earnings and deductions, and displays the net amount paid to him for a given pay period. It also provides information to the employee as to how the net amount was arrived at.

The Payroll Configuration can be enabled as shown below:

Gateway of Tally > F12: Configure > Payroll Configuration

In the above screen:

The option Show NI Number (for International companies only) and Show Statutory Details (for India/SAARC companies only) can be set to Yes to enter the NI details/ PF, ESI and PF PAN details in the Employee details form and print the same information in the Employee Payslip.

The options, Show Passport & Visa Details and Show Contract Details, should be set to Yes as shown, to display the Passport, Visa and Contract Details in the Expat Reports. If these options are set to No, then the Expat Reports menu will not be displayed under Payroll Reports. Some of the Information related to Employee passport such as Passport Number, Passport Expiry date, Visa Number, Visa Expiry date, Contract Start and Expiry dates will not be displayed at the creation of the Employee.

Wednesday, June 18, 2008

Synchronization Using Tally Link Server

Tally Link Server is a service under Tally Internet Services that allows you to synchronize data without worrying about the Fixed IP.
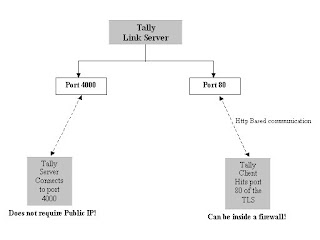
In a network environment, The Tally Server instance connects to the Tally Link Server, available on a public IP on a predefined port. The Tally Client instance connects to the Tally Link Server and communicates with the target Tally Serverinstance as long as the Tally server remains connected to the Tally Link Server
The destination Tally Server instance is identified using its unique TallyLinkId.
Thus, even if you have a dynamic IP on the Tally Server, you don’t need to change anything on the Client. Just log on to the Tally Link Server and stay connected.
The figure below depicts the complete picture:


Set Up for Synchronization
On Client Computer
1. Open Tally.ini file in the client computer and insert this line: clientserver=client
2. Execute Tally
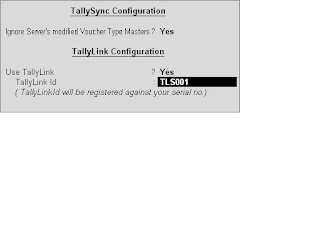
3. F12: Configure> Connectivity> Sync Configuration

TallySync Configuration
Ignore Server’s modified Voucher Type Masters?
To modify the client’s Voucher Type Masters during synchronization set this field to Yes.
TallyLink Configuration
Use TallyLink?
The field, Use TallyLink?, is set to No by default. If using the Tally Link Server, set this field to Yes.
TallyLink ID
Enter TallyLink ID to register against your serial number. This Id is required for the identification on
the TallyLink Server (TallyLink id can be a Tally Serial Number of the client machine or any name
which will be registered against the serial number).
On Server Computer
1. Open Tally.ini file on server computer and insert the following line: clientserver=server
Serverport = 20000 (any port between 1 to 64000, whichever is open. Note that the first 1000 to 1500 ports are standard ports, which must be avoided).

TallySync Configuration
Ignore Client's modified Voucher Type master?
To modify the server’s Voucher Type Masters by the client after synchronization set this field to Yes.
Enable Sync Logging (SockReq.log)
To log all requests and responses in a file called sockreq.log set this field to Yes. This will help when
debugging the sync process.
Truncate previous log before Syncing
This field appears only on setting Enable Sync Logging (Sockreq.log) to Yes. Setting Truncate
previous log before Syncing to Yes will delete the previous logs before logging in to the current session.
TallyLink Configuration
Use TallyLink?
Set to Yes to select Tally Link Server for syncing type TallyLink ID
Enter TallyLink ID to register against your serial number.
Connect to TallyLink Server
Set to Yes to establish a connection between the TallyLink Server and the remote Tally clients. (The Connect Button appears in the button bar. On opening the same screen next time use the Connect
Button to connect to TallyLink Server)
Connect on Startup
Set to Yes to connect to the TallyLink server on startup
Accept the Tally Sync Configuration screen. Click on Connect button on the button bar or press
ALT+N to connect to TallyLink server. If TallySync and TallyLink information are found correct, the
following message displays in the calculator pane: