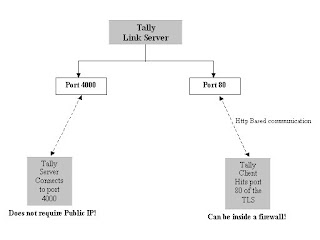
In a network environment, The Tally Server instance connects to the Tally Link Server, available on a public IP on a predefined port. The Tally Client instance connects to the Tally Link Server and communicates with the target Tally Serverinstance as long as the Tally server remains connected to the Tally Link Server
The destination Tally Server instance is identified using its unique TallyLinkId.
Thus, even if you have a dynamic IP on the Tally Server, you don’t need to change anything on the Client. Just log on to the Tally Link Server and stay connected.
The figure below depicts the complete picture:

Set Up for Synchronization
On Client Computer
1. Open Tally.ini file in the client computer and insert this line: clientserver=client
2. Execute Tally
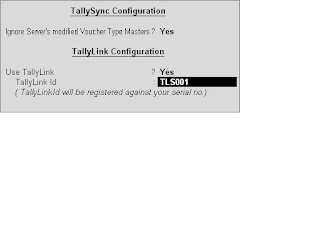
3. F12: Configure> Connectivity> Sync Configuration

TallySync Configuration
Ignore Server’s modified Voucher Type Masters?
To modify the client’s Voucher Type Masters during synchronization set this field to Yes.
TallyLink Configuration
Use TallyLink?
The field, Use TallyLink?, is set to No by default. If using the Tally Link Server, set this field to Yes.
TallyLink ID
Enter TallyLink ID to register against your serial number. This Id is required for the identification on
the TallyLink Server (TallyLink id can be a Tally Serial Number of the client machine or any name
which will be registered against the serial number).
On Server Computer
1. Open Tally.ini file on server computer and insert the following line: clientserver=server
Serverport = 20000 (any port between 1 to 64000, whichever is open. Note that the first 1000 to 1500 ports are standard ports, which must be avoided).

TallySync Configuration
Ignore Client's modified Voucher Type master?
To modify the server’s Voucher Type Masters by the client after synchronization set this field to Yes.
Enable Sync Logging (SockReq.log)
To log all requests and responses in a file called sockreq.log set this field to Yes. This will help when
debugging the sync process.
Truncate previous log before Syncing
This field appears only on setting Enable Sync Logging (Sockreq.log) to Yes. Setting Truncate
previous log before Syncing to Yes will delete the previous logs before logging in to the current session.
TallyLink Configuration
Use TallyLink?
Set to Yes to select Tally Link Server for syncing type TallyLink ID
Enter TallyLink ID to register against your serial number.
Connect to TallyLink Server
Set to Yes to establish a connection between the TallyLink Server and the remote Tally clients. (The Connect Button appears in the button bar. On opening the same screen next time use the Connect
Button to connect to TallyLink Server)
Connect on Startup
Set to Yes to connect to the TallyLink server on startup
Accept the Tally Sync Configuration screen. Click on Connect button on the button bar or press
ALT+N to connect to TallyLink server. If TallySync and TallyLink information are found correct, the
following message displays in the calculator pane:


1 comment:
Try...
Free Bulk import excel data into tally with SMART Excel to Tally Software Version.
Download Link - http://www.xltally.in
Post a Comment